
Jump to Step # Intro 0 1 2 3 4 5 6 7 8
Step 3: Creating and Applying the "Ink" Maps
Once the basic texture mapping has been completed, the next step is to move to the "Ink" maps. These a texture maps that will represent the "Ink" lines on the texture maps. I decided to have these as different maps and not as part of the regular texture map so that I could use the regular texture map for normal 3D renders if I wanted to. Basically, the regular texture maps are the colors and the "Ink" maps are the lines between the different colors. An advantage of doing this is that the color texture maps can be swapped out with solid white texture maps to get a render that looks inked but not colored.
There will be at least one "Ink" map for every regular texture map. In a few cases, such as the BodySuit, I decided to use multiple "Ink" maps: one for the standard BodySuit and one for the lines unique to the character. In this case, the second "Ink" map would be the one with the black lines for the Superman logo. This allows me to use the first one for other character designs. (Most of the playing around I've been doing with this technique has been with a costume design I created but didn't want to use for the tutorial.) I could have just as easily used a single "Ink" map for the BodySuit that served both purposes.
I took a somewhat minimalist approach on this but you can just as easily go for thicker lines. On some of the thumbnails for the file downloads, the lines sort of fade away. So, while the thumbnails might look blank, the actual "Ink" maps in the ZIP files do have lines in them.
I'm going to expand the Materials palette to give us some more working space. I'll be switching back to the Pose Room for the screen shots that show the preview window.
Step 3-A: Create the Standard "Ink" Map for Michael's Head
The "Ink" map for the head is what will create the black lines around the eyes and lips. I started by using UV Mapper Pro to create a texture template for the Michael with just the following materials: EyeSocket, InnerMouth, Lacrimal, Lips, Nostrils, SkinHead, SkinLeg, SkinNeck, SkinScalp and Tongue. I then loaded a copy of the texture template in Paint and the Michael model in UV Mapper Pro. I positioned the model in the 3D view in UV Mapper Pro to give me a good closeup view of the face. As I made changes to the texture map, I saved it in Paint and reloaded it in UV Mapper Pro to see how it looked. (The Face Camera in Poser can be used for the same purpose but requires rendering each time.) I then draw in the ink lines that I want to define the lips and eyes. I find that a minimalist approach on this seems to be best since the final texture map needs to be able to be viewed from any angle.
Here is the "Ink" map that I used for the Michael's head:  (4 KB)
Step 3-B: Apply the "Ink" Map to Michael's Head
Now that we have a texture map for the Michael's head, we should load it onto Michael's head in Poser 5. The materials we'll be working with in this step are: EyeSocket, Lacrimal, Lips, Nostrils, SkinHead, SkinScalp, InnerMouth and Tongue.
To start, go to the node tree in the Material Room for the SkinHead material on the Michael model. We are going to set up this node tree and copy it to the other materials.

Let's create an Image_Map node and load the "Ink" map we want to use for Michael's head:

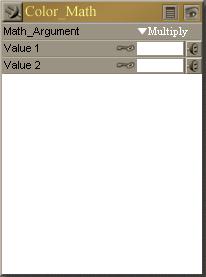
Let's create a Color_Math node and set the Math_Argument to Multiple and Value 1 and Value 2 to pure white:

We'll now plug the Color_Texture node into Value 1 (the texture map) and the Image_Map_2 node (the "Ink" map) into Value 2 of the Color_Math node. Then, plug the Color_Math node into the Diffuse_Color socket of the PoserSurface node:
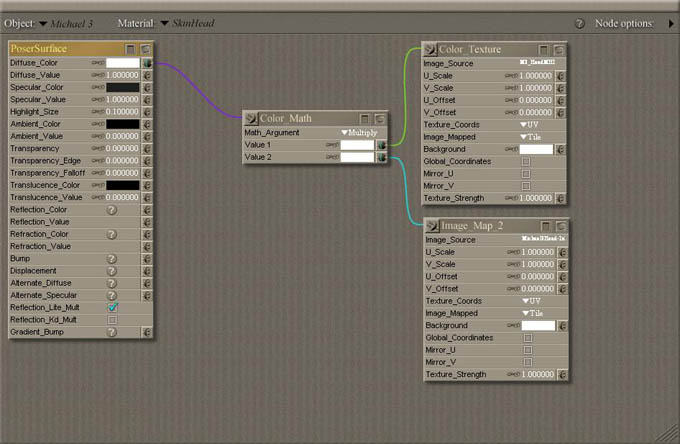
This sets up the "Ink" map for the SkinHead material of Michael's head.
To set up the "Ink" map for the other material on Michael's head (EyeSocket, Lacrimal, Lips, Nostrils, SkinScalp, InnerMouth and Tongue): right-click on the PoserSurface node and then Shift-right-click on each of the other nodes, right-click on one of them and select Copy from the pop-up menu. Switch to one of the other materials for Michael's head, delete any existing nodes and Paste the node tree into that material. Switch to another material and Paste the node tree until all of the materials have been done.
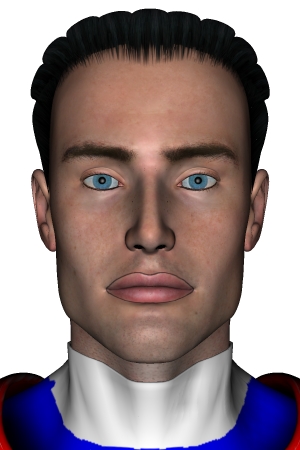
Note that the "Ink" maps do not appear in the preview window but do appear in the Face Camera render.

Save point: Tutorial-Step3B.pzz = 4,080 KB
| Main Camera | Aux Camera |
|---|---|

|

|
| Face Camera | Right Hand Camera |
|

|
Step 3-C: Create the Standard "Ink" map for Michael's Eyes
To create the "Ink" Map for the eyes, I took a copy of the texture map for the eye into PhotoShop. I used the Find Edge filter to create the lines and saved this as a bitmap. I then loaded the bitmap into Paint and dropped the color depth down to 16. Then I filled each of the line regions to solid black. I then dropped the color depth down to black and white.
When I loaded the texture map onto the model in UV Mapper Pro, I was a bit surprised by how light the lines were. After playing with it for a while, I discovered that if I stretched the "Ink" map in Paint by 25% and then again by 50% and used the smaller file, the lines showed up great.
Here is the "Ink" map that I used for the Michael's eyes:  (1 KB)
Step 3-D: Apply the "Ink" Map to Michael's Eyes
Now that we have a texture map for the Michael's head, we should load it onto Michael's eyes in Poser 5. The materials we'll be working with in this step are: LCornea, LEyewhite, LIris, LPupil, RCornea, REyewhite, RIris and RPupil.
To start, go to the node tree in the Material Room for the LEyewhite material on the Michael model. We are going to set up this node tree and copy it to the other materials.

Let's create an Image_Map node and load the "Ink" map we want to use for Michael's eyes:

Let's create a Color_Math node and set the Math_Argument to Multiple and Value 1 and Value 2 to pure white:
We'll now plug the Color_Texture node into Value 1 (the texture map) and the Image_Map_2 node (the "Ink" map) into Value 2 of the Color_Math node. Then, plug the Color_Math node into the Diffuse_Color socket of the PoserSurface node (leaving the Color_Texture plugged into the Specular_Color of the PoserSurface for now):
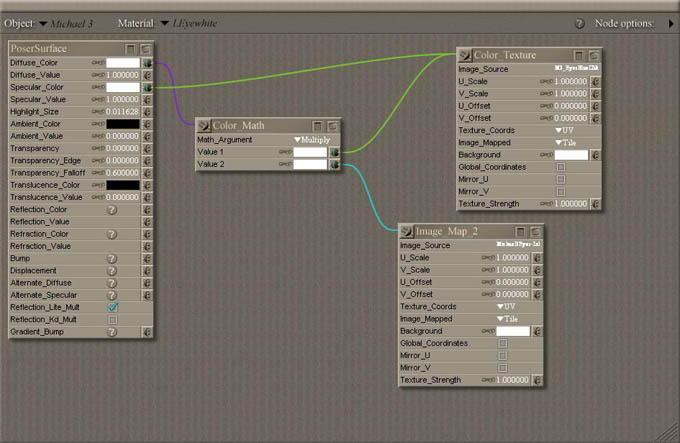
This sets up the "Ink" map for the LEyewhite material of Michael's eyes.
To set up the "Ink" map for the other material on Michael's eyes (LCornea, LIris, LPupil, RCornea, REyewhite, RIris and RPupil): right-click on the PoserSurface node and then Shift-right-click on each of the other nodes, right-click on one of them and select Copy from the pop-up menu. Switch to one of the other materials for Michael's head, delete any existing nodes and Paste the node tree into that material. Switch to another material and Paste the node tree until all of the materials have been done.

Save point: Tutorial-Step3D.pzz = ???? KB
| Main Camera | Aux Camera |
|---|---|

|

|
| Face Camera | Right Hand Camera |

|

|
Step 3-E: Create the Standard "Ink" Map for the BodySuit
The standard "Ink" map that I created for the BodySuit has the "Ink" lines for the end of the sleeves and legs of the BodySuit and the neck line. I started by creating a texture template using UV Mapper Pro. I then took a copy of this map and drew the lines where they needed to be using UV Mapper Pro to check my work.
Here is the standard "Ink" map that I used for the BodySuit:  (4 KB)
Step 3-F: Apply the Standard "Ink" Map to BodySuit
Now that we have a "Ink" map for the BodySuit, we should load it onto the BodySuit in Poser 5. The materials we'll be working with in this step are: Crew, ForeArm, Hip, Shin, Shoulder, Tank, Thigh and TurNeck.
To start, go to the node tree in the Material Room for the Tank material on the BodySuit. We are going to set up this node tree and copy it to the other materials.

Let's create an Image_Map node and load the Standard "Ink" for the BodySuit:

Let's create a Color_Math node and set the Math_Argument to Multiple and Value 1 and Value 2 to pure white:
We'll now plug the Color_Texture node into Value 1 (the texture map) and the Image_Map_2 node (the "Ink" map) into Value 2 of the Color_Math node. Then, plug the Color_Math node into the Diffuse_Color socket of the PoserSurface node:

This sets up the Standard "Ink" map for the Tank material of the BodySuit.
To set up the "Ink" map for the other material on the BodySuit (Crew, ForeArm, Hip, Shin, Shoulder, Thigh and TurNeck): right-click on the PoserSurface node and then Shift-right-click on each of the other nodes, right-click on one of them and select Copy from the pop-up menu. Switch to one of the other materials for Michael's head, delete any existing nodes and Paste the node tree into that material. Switch to another material and Paste the node tree until all of the materials have been done.

To set up the texture map for the other material (Crew, ForeArm, Hip, Shin, Shoulder, Thigh and TurNeck): right-click on the PoserSurface node and then Shift-right-click on the Image_Map nodes, right-click on one of them and select Copy from the pop-up menu. Switch to one of the other materials and Paste the node tree into that material. Switch to another material and Paste the node tree until all of the materials have been done.
Save point: Tutorial-Step3F.pzz = ???? KB
| Main Camera | Aux Camera |
|---|---|

|

|
| Face Camera | Right Hand Camera |

|

|
Step 3-G: Create the Superman "Ink" map for the BodySuit
To create the "Ink" map for the Superman costume, I took a copy of the Superman texture map for the BodySuit into PhotoShop and used the Find Edge filter. I then loaded that bitmap into Paint and dropped the color depth down to 16 and filled the lines with solid black. I erased the lines that were on the seams of the material regions. This left the lines for the Superman logo, the trunks and the belt.
Here is the custom "Ink" map that I used for the BodySuit:  (8 KB)
Step 3-H: Apply the Superman "Ink" Map to BodySuit
Now that we have a texture map for the BodySuit, we should load it onto the BodySuit in Poser 5. The BodySuit materials we will be working with in this step are: TurNeck, Crew, Tank, Shoulder, Hip, Shin, Thigh and ForeArm.
To start, go to the node tree in the Material Room for the Tank material on the BodySuit model. We are going to set up this node tree and copy it to the other materials.

Let's create another Image_Map node and load the Custom "Ink" map for the BodySuit:
Now create another Color_Math node and set the Math_Argument to Multiple and Value 1 and Value 2 to pure white:

We'll now plug the Image_Map_2 node (the standard "Ink" map) into Value 1 of the Color_Math_2 node and the Image_Map_3 node (the custom "Ink" map) into the Value 2 socket of the Color_Math_2 node. Then, well plug the Color_Math_2 node into the Value 2 socket of the Color_Math node:

This adds the custom "Ink" map to the node tree for the Tank material.
To set up the texture map for the other material (Crew, ForeArm, Hip, Shin, Shoulder, Thigh and TurNeck): right-click on the PoserSurface node and then Shift-right-click on the Image_Map nodes, right-click on one of them and select Copy from the pop-up menu. Switch to one of the other materials and Paste the node tree into that material. Switch to another material and Paste the node tree until all of the materials have been done.

Save point: Tutorial-Step3H.pzz = ???? KB
| Main Camera | Aux Camera |
|---|---|

|

|
| Face Camera | Right Hand Camera |

|

|
Step 3-I: Create the standard "Ink" map for the Boots
For the standard "Ink" map for the Boots, I wanted something to help define the basic shape. A simple line at the top and around the top and bottom of the soles seemed sufficient. This was done by hand using Paint and UV Mapper Pro to check my progress.
The reason we have to create the "Ink" lines for the top of the Boots is because the Edge_Blend node won't do it for us. See the discussion of the Edge_Blend node in Step 6 for more information.
Here is the standard "Ink" map that I used for the Boots:  (20 KB)
Step 3-J: Apply the Standard "Ink" Map to Boots
Now that we have a "Ink" map for the Boots, we should load it onto the Boots in Poser 5. The materials we'll be working with in this step are: Cloth, Sole-Bottom, Sole-Edge and Sole-Label.
To start, go to the node tree in the Material Room for the Cloth material on the Boots. We are going to set up this node tree and copy it to the other materials.

Let's create an Image_Map node and load the Standard "Ink" map for the Boots:

Let's create a Color_Math node and set the Math_Argument to Multiple and Value 1 and Value 2 to pure white:

We'll now plug the Color_Texture node into Value 1 (the texture map) and the Image_Map_2 node (the "Ink" map) into Value 2 of the Color_Math node. Then, plug the Color_Math node into the Diffuse_Color socket of the PoserSurface node:

This sets up the Standard "Ink" map for the Cloth material of the Boots.
To set up the "Ink" map for the other material on the Boots (Sole-Bottom, Sole-Edge and Sole-Label): right-click on the PoserSurface node and then Shift-right-click on each of the other nodes, right-click on one of them and select Copy from the pop-up menu. Switch to one of the other materials for Michael's head, delete any existing nodes and Paste the node tree into that material. Switch to another material and Paste the node tree until all of the materials have been done.

Save point: Tutorial-Step3J.pzz = ???? KB
| Main Camera | Aux Camera |
|---|---|

|

|
| Face Camera | Right Hand Camera |
|

|
Step 3-K: Create the Superman "Ink" map for the Boots
For the Superman "Ink" map for the Boots, I needed to redefine top of the Boots into the distinctive cut of Superman's boots. This was done by hand (involving lots of trial and error) in Paint using UV Mapper Pro to check my progress. It took a little while to find the center point of the boots and get the V right. Once I had that, it was just a matter of drawing a straight line to the back of the boot on each side. I then copied this top line and pasted it slightly lower to get the second line.
Here is the custom "Ink" map that I used for the Boots:  (25 KB)
Step 3-L: Apply the Superman "Ink" Map to Boots
Now that we have a texture map for the BodySuit, we should load it onto the Boots in Poser 5. The Boots materials we will be working with in this step are: Cloth, Sole-Bottom, Sole-Edge and Sole-Label.
To start, go to the node tree in the Material Room for the Cloth material on the Boots model. We are going to set up this node tree and copy it to the other materials.

Let's create another Image_Map node and load the Custom "Ink" map for the Boots:

Now create another Color_Math node and set the Math_Argument to Multiple and Value 1 and Value 2 to pure white:

We'll now plug the Image_Map_2 node (the standard "Ink" map) into Value 1 of the Color_Math_2 node and the Image_Map_3 node (the custom "Ink" map) into the Value 2 socket of the Color_Math_2 node. Then, well plug the Color_Math_2 node into the Value 2 socket of the Color_Math node:

This adds the custom "Ink" map to the node tree for the Cloth material.
To set up the texture map for the other material (Sole-Bottom, Sole-Edge and Sole-Label): right-click on the PoserSurface node and then Shift-right-click on the Image_Map nodes, right-click on one of them and select Copy from the pop-up menu. Switch to one of the other materials and Paste the node tree into that material. Switch to another material and Paste the node tree until all of the materials have been done.

Save point: Tutorial-Step3L.pzz = ???? KB
| Main Camera | Aux Camera |
|---|---|

|

|
| Face Camera | Right Hand Camera |

|

|
Step 3-M: Create the Superman "Ink" map for the VersaCloak
We don't really need a standard "Ink" map for the VersaCloak. All we really need is an "Ink" map for the Superman logo on the outside of the cape. I used the Find Edge filter in PhotoShop on the texture map for the OuterCloak texture for the VersaCloak. Using the same technique as for the BodySuit, I dropped the color depth and cleaned up the image. This gave me the black lines needed for the Superman logo. Having done that, I archived a copy of the texture map for the OuterCloak and altered the one I was using to have a solid yellow Superman logo by filling the red regions with yellow.
Here is the custom "Ink" map that I used for the VersaCloak:  (??? KB)
Step 3-N: Apply the Superman "Ink" Map to VersaCloak
To start, go to the node tree in the Material Room for the OuterCloak material on the VersaCloak. This is the only material we need to set up with an "Ink" map for the VersaCloak.

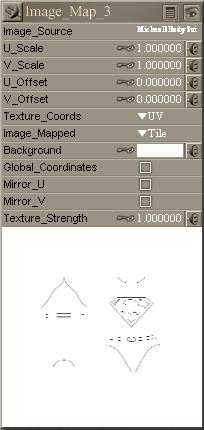
Let's create an Image_Map node and load the Standard "Ink" map for the VersaCloak:

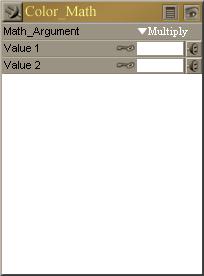
Let's create a Color_Math node and set the Math_Argument to Multiple and Value 1 and Value 2 to pure white:

We'll now plug the Color_Texture node into Value 1 (the texture map) and the Image_Map_2 node (the "Ink" map) into Value 2 of the Color_Math node. Then, plug the Color_Math node into the Diffuse_Color socket of the PoserSurface node:
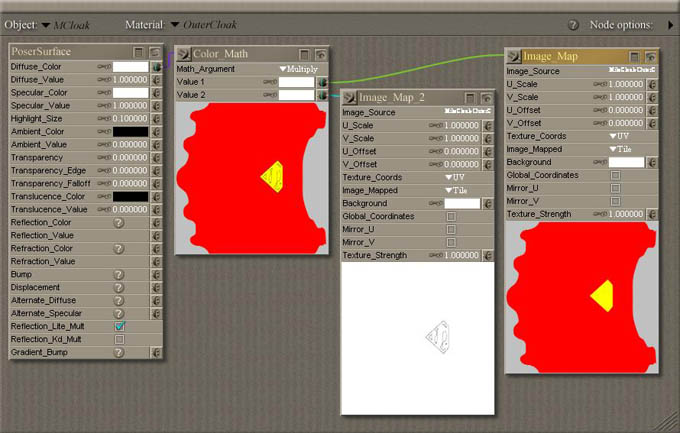
This sets up the custom "Ink" map for the OuterCloak material of the VersaCloak.
Save point: Tutorial-Step3N.pzz = ???? KB
| Main Camera | Aux Camera |
|---|---|

|

|
| Face Camera | Right Hand Camera |

|

|
If you want to see how the scene looks with just the "Ink" maps, copy the various texture maps into another folder and then replace them with solid white texture maps with the same names. These files can be as small as a 1x1 pixel file. You might need to close Poser and re-open it for it reload the new blank texture maps corectly.
Continue on to Step 4: Creating and Applying the Transparency Maps
Jump to Step # Intro 0 1 2 3 4 5 6 7 8
![]()
![]()